Spring Boot에서 @SpringBootApplication가 사용되는 방법과 자동 설정에 대해서 설명하고, 자동 설정 구현을 통해서 @EnableAutoConfiguration가 어떤 방식으로 이용되는지 설명한다.
자동 설정 설명
Bean은 2단계로 등록된다. @ComponentScan으로 등록된 후 추가적으로 @EnableAutoConfiguration으로 등록한다.1
2
3
4
5
6
public class autoApplication {
public static void main(String[] args) {
SpringApplication.run(autoApplication.class, args);
}
}
@SpringBootApplication에 상속되어있는 어노테이션에 대해서 확인1
2
3
4
5
6
7
8
9
10
11
12(ElementType.TYPE)
(RetentionPolicy.RUNTIME)
(excludeFilters = {
(type = FilterType.CUSTOM, classes = TypeExcludeFilter.class),
@Filter(type = FilterType.CUSTOM, classes = AutoConfigurationExcludeFilter.class) })
public @interface SpringBootApplication {
...
}
여기서 중요한 @SpringBootConfiguration, @ComponentScan, @EnableAutoConfiguration에 대해서 설명 한다.
@SpringBootConfiguration에 상속된@Configuration는 Java Configure 설정 파일로 간주하여Bean으로 등록한다. 즉, Spring Boot에서 사용되는 설정 파일 이다.@ComponentScan는 Component 가진 하위 패키지 클래스들을Bean으로 등록한다.@EnableAutoConfiguration은 애플리케이션에 추가된 설정들을 자동으로Bean으로 등록한다.
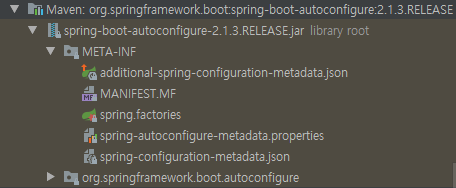
spring.factories를 확인해보면
EnableAutoConfiguration키값 밑에 설정된 클래스들은 autoConfiguration 대상이 되는 된다. 대부분의 클래스는@Configuration을 가지고 있으나,@ConditionalOnXxxYyyZzz가 있으면 조건에 따라서 다르게 등록된다. (Spring Boot Reference Condition Annotations 참조)
자동 설정 구현
Spring Boot에서 자동 설정을 실제로 구현해보는 예제이다. 여기서 필요한 모듈은 2가지 이다. 1.자동 설정 모듈과 2.의존성을 주입한 모듈이다.
자동 설정 모듈
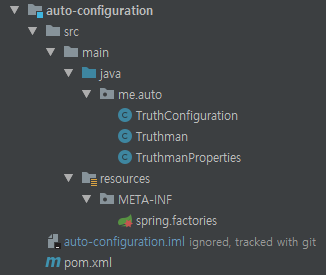
모듈 구조

pom.xml 에 의존성 추가
pom.xml 1
2
3
4
5
6
7
8
9
10
11
12
13
14
15
16
17
18
19
20
21
22
23
24<dependencies>
<dependency>
<groupId>org.springframework.boot</groupId>
<artifactId>spring-boot-autoconfigure</artifactId>
</dependency>
<dependency>
<groupId>org.springframework.boot</groupId>
<artifactId>spring-boot-autoconfigure-processor</artifactId>
<optional>true</optional>
</dependency>
</dependencies>
<dependencyManagement>
<dependencies>
<dependency>
<groupId>org.springframework.boot</groupId>
<artifactId>spring-boot-dependencies</artifactId>
<version>2.1.3.RELEASE</version>
<type>pom</type>
<scope>import</scope>
</dependency>
</dependencies>
</dependencyManagement>Truthman 클래스 생성
Truthman.java 1
2
3
4
5
6
7
8
public class Truthman {
private String name;
private int howLong;
}Properties 정의
의존성 주입대상인application.yaml에서truthman접두사로 정의한 값을 이용TruthmanProperties.java 1
2
3
4
5
6
7
8
9
("truthman")
public class TruthmanProperties {
private String name;
private int howLong;
}Configuration 정의
TruthmanProperties에 값을 받아서Truthman인스턴스 생성 후 주입한다.@ConditionalOnMissingBean은 의존성을 주입할 대상에서 같은이름(truthman)Bean이 존재하지 않을 때Bean을 생성한다.TruthConfiguration.java 1
2
3
4
5
6
7
8
9
10
11
12
13
14
(TruthmanProperties.class)
public class TruthConfiguration {
public Truthman truthman(TruthmanProperties truthmanProperties) {
Truthman truthman = new Truthman();
truthman.setName(truthmanProperties.getName());
truthman.setHowLong(truthmanProperties.getHowLong());
return truthman;
}
}resources\META-INF\spring.factories 생성
@EnableAutoConfiguration으로Bean으로 등록spring.factories 1
2org.springframework.boot.autoconfigure.EnableAutoConfiguration=\
me.auto.TruthConfigurationmvn install
의존성을 주입한 모듈
자동 설정 모듈의 의존성을 주입한다.
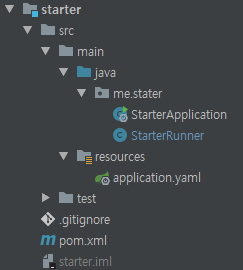
모듈 구조

pom.xml에 등록(자동 설정 모듈 install)
pom.xml 1
2
3
4
5<dependency>
<groupId>me.auto</groupId>
<artifactId>auto-configuration</artifactId>
<version>1.0-SNAPSHOT</version>
</dependency>resources/application.yaml
Spring Boot 버젼 2.1.x 이상부터 Bean 오버라이딩(@ConditionalOnMissingBean) 기능 이용 시spring:main:allow-bean-definition-overriding: true를 추가해야 된다.application.yaml 1
2
3
4
5
6
7spring:
main:
allow-bean-definition-overriding: true
truthman:
name: jaehyun22
how-long: 33StarterRunner 생성
StarterRunner.java 1
2
3
4
5
6
7
8
9
10
11
public class StarterRunner implements ApplicationRunner {
Truthman truthman;
public void run(ApplicationArguments args) throws Exception {
System.out.println(truthman);
}
}실행 결과
1
Truthman(name=jaehyun22, howLong=33)
